In this thread I'll show how I build a steel string guitar and also discuss some common alternatives that others use. I'll explore some guitar myths and theories. Talk about wood. Show jigs that aid in construction. Eventually a finished guitar will result.
If you want to build your own guitar I think you'll find something useful here. If you like guitars and want to learn more about them then you may enjoy this too. If you have your own ideas on alternative ways to do things then by all means share them.
One could spend a lifetime or two learning all the details and technologies that go into producing a steel string guitar. Imagine how much time one could spend writing about it, so from time to time, when a subject has more than enough good information all ready available I'll simply suggest a google search for further research or supply a pointer.
The guitar that I'll be building has dimensions close to a Martin 00, the basic design features and build processes are compatible with any traditionally styled acoustic guitar. Some methods are borrowed from classical guitar building techniques.
Much of my build style uses hand tools although I make considerable use of a drill press and router. A bandsaw comes in handy from time to time, especially for making jigs and fixtures which help with alignment and such. (Warning – it is very easy to start out wanting to make a guitar in your basement and ending up with a guitar factory in the basement instead. Enough said.)
Make yourself comfortable, this will take a while.
Building a Steel String Guitar
a step by step show and tell
Moderators: kiore, Blip, The_Metatron
Re: Building a Steel String Guitar
#2 ![]() by John Platko » Oct 06, 2015 5:27 pm
by John Platko » Oct 06, 2015 5:27 pm
Some Basics
Wood is the principle material used for building steel string guitars. There are many good books that will teach you all you would ever want to know about wood. For the serious enthusiast I would recommend:
Understanding Wood: A Craftsman's Guide to Wood Technology by Bruce Hoadley.
For steel string guitars typical construction uses a soft wood (spruce or cedar) for the top and a hardwood (rosewood, mahogany, koa, maple etc.) for the sides and back. Mahogany or Spanish cedar are used for the neck. To be sure, other woods can also be used.
Here are some popular choices for top wood. Red spruce also known as Adirondack spruce was used by Martin in their “golden era”. Eventually red spruce was no longer available and it was replaced by Sitka spruce. Today many steel string acoustic guitars are built with Sitka spruce tops but red spruce is once again available in limited supplies.
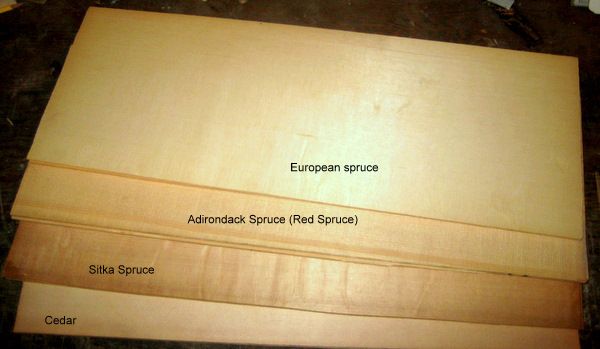
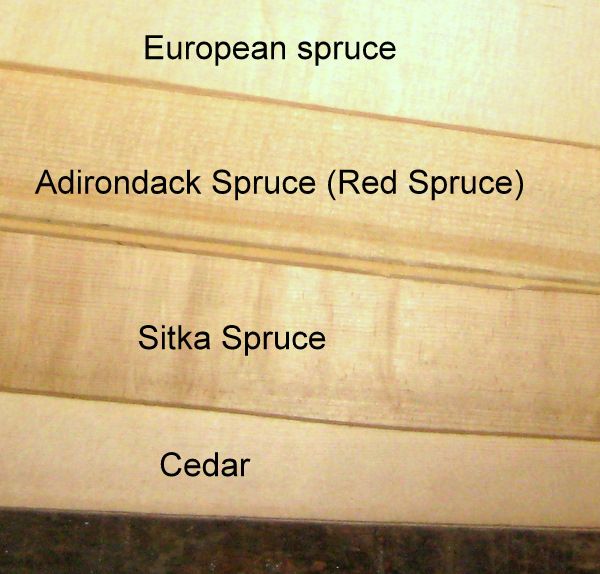
For someone building their first guitar I would strongly recommend, Sitka spruce for the top wood. Indian rosewood for the sides and back. Honduras mahogany for the neck. There are many reasons why I like those choices, suffice it to say that I think they give you the best chance of ending up with a guitar that you'll be happy with. Of course, if you just don't like the sound of a rosewood guitar then perhaps that wouldn't be a good choice for you.
Tone Wood
In the guitar world you'll often, and I mean often, come across the phrase “tone wood”. It's meant to refer to magical wood with magical qualities destined for instruments. Let me see, how should I put this- there's no such thing as “tone wood”. To be sure, some wood is a better choice to use for guitars than other pieces of wood, and different types of wood tends to make different sounding guitars. But you can find good wood for building guitars from someone who isn't selling “tone wood.”
The best way to get a sense of how different types of wood sound when they're used for guitar construction is to play different guitars made with different kinds of wood. Most people quickly get the idea.
What makes wood suitable for a guitar.
Stability
For reasons which should be pretty obvious you want the wood used to be as stable as possible. That is, you don't want it shrinking and cracking. You don't want the neck warping this way and that. You want it to stay the way it was built.
The way you cut a piece of wood out of the tree it grew from can go a long way in resulting in a very stable piece of lumber. To make a long story short, quartersawn lumber is the most stable. The picture below shows how quartersawn lumber is harvested radially from a log. The result is long straight vertical grain lines running the length of the board. These grain lines are perpendicular to the the edge of the board.
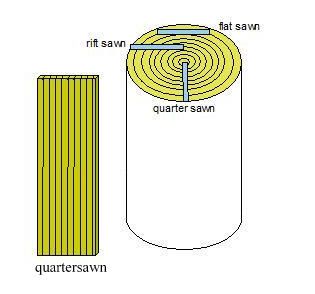
The more perpendicular the grain lines the more strength the board will have across the grain. Good guitar wood is “well quartered” wood for the top, back, sides, and neck.
Moisture content
I won't go into all the details here unless there's a request to do so, (google or read Hoadley's book for the rest of the story) but wood will take on or give off moisture depending on the relative humidity (RH) of the environment it is in. As wood takes on or gives off moisture it stretches or shrinks. Because the parts of a guitar are glued in place they have a limited tolerance for this stretching and shrinking before cracking comes into the picture. Some construction techniques can help this a bit.
The guitar builder and player must be aware of this hygroscopic property of wood. For the builder it means, wood ,must be dry enough before it is used to build an instrument. The instrument must be built in an environment where the RH is controlled. A range of 40 to 55 RH would work. Some very good builders go a lot lower. It's not a good idea to build in higher RH. The moisture content of your wood should be around 6-7 percent before you use it. Wood sitting in an RH of 40-55% will eventually get there.
Aging also effects wood as resins harden. This is know as seasoning. I won't say much about this other than “season to taste.”
I would recommend that a new builder buy wood from a luthier supplier and then keep the wood in an RH controlled environment throughout the build unless you know enough about wood to go it on your own.
I'll talk more about specific kinds of wood as I build.
Tools
You'll need some tools to build a guitar but you won't need as many as you'll see me use as I build. I have no good explanation as to why that is so. Also, although nice tools are nice, you don't need fancy tools to make a guitar. It is far more important to have a well sharpened blade or a well setup plane than a particular brand of tool. I think this tutorial would be better if I didn't use some of the more exotic and expensive hand tools – at least I don't use any fancy power tools. At some point I'll put together a basic list of tools needed but it really all depends on individual preference. Some tools work well for some folks and not others- such is life. Like every other aspect of guitar building it takes trial and error and experience to know what works for you. I'll talk more about specific tools as I go along.
Glue
With the possible exception of the neck joint the guitar is held together with glue. Traditionally hot hide glue was used. Hot hide glue has been used for centuries and it works. There's a bit of a learning curve involved with hot hide glue but it's not that hard to use. A good alternative glue is Original Titebond. Titebond is readily available, easy to use, and it works. There's nothing wrong with building a guitar using Titebond for the glue.
I'll be using both hot hide glue and Titebond because for me they each have an advantage for certain aspects of the guitar. You can however, substitute one for the other at any place in the build process.
I'll also use a dab of superglue (Cyanoacrylate) from time to time.
Jigs
Unfortunately I use a fare number of jigs in the building process. These can be simple things like side molds which help keep the bent sides aligned until they are glued in place to more complicated things like binding router jigs. It is possible to build a good guitar without any jigs and I kind of feel that this would be a better tutorial if I didn't use any. On the other hand, steel sting guitars as we know them were a factory invention and tooling was and is most definitely used to build them. Even the Spanish classical guitar makers use some tooling to help with construction. In fact, I use some of the Spanish tooling too!
In the end every builder needs to decide for themselves how many jigs, fixtures, tooling, CNC machines is right for them. Ask yourself, why am I doing this and do I really want a factory in my basement.
As I go along I'll mention what tooling I recommend using and what alternative method might substitute.
Perfection
The whole purpose of jigs and tooling is to help make the guitar more perfect. Sometimes lack of perfection will have really bad effects on the usability of the instrument. If the frets are in the wrong place the instrument won't play in tune. If the action is way too high the instrument will be too hard to play. If glue joints are not made well enough they will fall apart. A very good guitar can be made by hand building without the use of specialized jigs. But jigs ,make it easier to do. In the end you need to decide on the degree of perfection you're going for and the building style that you want to engage in.
Enough for the basics. I'll get started building in the next post and I expect there will be more pictures and less words.
I like to imagine ...
-

John Platko - THREAD STARTER
- Name: John Platko
- Posts: 9411

- Country: US
")
Re: Building a Steel String Guitar
#3 ![]() by laklak » Oct 06, 2015 5:32 pm
by laklak » Oct 06, 2015 5:32 pm
I'm looking forward to this thread! Last thing I need is another project, but what the Hell.
A man who carries a cat by the tail learns something he can learn in no other way. - Mark Twain
The sky is falling! The sky is falling! - Chicken Little
I never go without my dinner. No one ever does, except vegetarians and people like that - Oscar Wilde
The sky is falling! The sky is falling! - Chicken Little
I never go without my dinner. No one ever does, except vegetarians and people like that - Oscar Wilde
-

laklak - RS Donator
- Name: Florida Man
- Posts: 20878
- Age: 70
- Country: The Great Satan
")
Re: Building a Steel String Guitar
#4 ![]() by John Platko » Oct 07, 2015 1:01 pm
by John Platko » Oct 07, 2015 1:01 pm
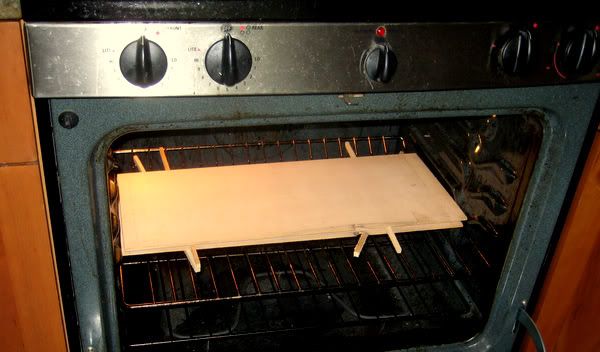
Step 1 preheat your oven to 200 degrees!
1 - Baking the Top
This is a trick I learned from Taylor Guitars, they bake all their tops.
While there is no way to completely stop the hygroscopic property of wood, its effect can be blunted by bringing the wood to an essentially 0 moisture point. This is done by baking the wood. This process should not be confused with kiln drying wood which happens at a very different point in the wood processing and has a different purpose. Kiln drying is done to remove the free water in the wood and if done improperly it can damage the cell structure of the wood. Baking the top as described here is done after the wood has already reached a 6-8 % moisture point.
The top wood is stickered (a few sticks used as supports near the ends of the wood to keep to keep it out of contact with anything below it so air can freely pass above and below the wood) and placed in an oven at 190 to 200 degrees F for about 2 hours.
The dimensions of wood is effected, much more across the grain than in the other two directions. On a guitar top, that's the direction roughly parallel to the saddle.
On a 221 mm piece of top wood I measured a 2 mm shrinkage after the wood came out of the oven.
Much smaller amounts of shrinkage occur in the direction from the heel to the tail of the guitar and in the thickness of the top.
After about 4 days in a humidity controlled environment the wood recovers most of the dimension it lost, however not all of it. Across the grain the 210 mm piece of wood ended up about .3 mm smaller at the same RH. The “pre-shrunk” state is expected to be more stable.
Baking is claimed to also have effects of hardening resins in the wood and accelerating the seasoning process of the wood.
1 - Baking the Top
This is a trick I learned from Taylor Guitars, they bake all their tops.
While there is no way to completely stop the hygroscopic property of wood, its effect can be blunted by bringing the wood to an essentially 0 moisture point. This is done by baking the wood. This process should not be confused with kiln drying wood which happens at a very different point in the wood processing and has a different purpose. Kiln drying is done to remove the free water in the wood and if done improperly it can damage the cell structure of the wood. Baking the top as described here is done after the wood has already reached a 6-8 % moisture point.
The top wood is stickered (a few sticks used as supports near the ends of the wood to keep to keep it out of contact with anything below it so air can freely pass above and below the wood) and placed in an oven at 190 to 200 degrees F for about 2 hours.

The dimensions of wood is effected, much more across the grain than in the other two directions. On a guitar top, that's the direction roughly parallel to the saddle.
On a 221 mm piece of top wood I measured a 2 mm shrinkage after the wood came out of the oven.
Much smaller amounts of shrinkage occur in the direction from the heel to the tail of the guitar and in the thickness of the top.
After about 4 days in a humidity controlled environment the wood recovers most of the dimension it lost, however not all of it. Across the grain the 210 mm piece of wood ended up about .3 mm smaller at the same RH. The “pre-shrunk” state is expected to be more stable.
Baking is claimed to also have effects of hardening resins in the wood and accelerating the seasoning process of the wood.
I like to imagine ...
-
John Platko - THREAD STARTER
- Name: John Platko
- Posts: 9411
- Country: US
Re: Building a Steel String Guitar
#5 ![]() by Sendraks » Oct 07, 2015 1:09 pm
by Sendraks » Oct 07, 2015 1:09 pm
Question - given most domestic ovens are not especially large, is it possible to bake the wood for your top in manageable parts for assembly later?
"One of the great tragedies of mankind is that morality has been hijacked by religion." - Arthur C Clarke
"'Science doesn't know everything' - Well science knows it doesn't know everything, otherwise it'd stop" - Dara O'Brian
"'Science doesn't know everything' - Well science knows it doesn't know everything, otherwise it'd stop" - Dara O'Brian
-

Sendraks - Name: D-Money Jr
- Posts: 15260
- Age: 107
- Country: England
Re: Building a Steel String Guitar
#6 ![]() by John Platko » Oct 07, 2015 2:40 pm
by John Platko » Oct 07, 2015 2:40 pm
Sendraks wrote:Question - given most domestic ovens are not especially large, is it possible to bake the wood for your top in manageable parts for assembly later?
The only wood for the guitar that is baked is the top wood, i.e. the soft wood. Almost universally, two pieces of wood are used for the top. The length of the wood needs to match the length of the guitar body. On a big guitar, say a Martin Dreadnaught, that's 20". So if your oven is >20" which is typical in the US, you're good to go. If you're oven is not wide enough to fit the length of body wood then skip the baking step because there is no good way to join top wood lengthwise. That would be an end grain joint and it's not strong enough without doing unconventional reinforcement.
On a big guitar, again a Martin Dreadnaught, the width is 15 5/8" , and since you use two pieces of wood to arrive at that width, maybe starting with something like 6.5" pieces, it's not a problem fitting in depth wise in a standard oven.
It is possible to use more than two pieces of wood for the top but not too common. When done, it's more common to add some wood to widen the bottom bout of both sides of the guitar so symmetry is maintained.
As far as I know, this baking step is a Taylor Guitar invention, it's not an old Martin Guitar tradition, although I've heard stories that they would stack the wood near the furnace in the factory during the cold PA winters. The luthier I studied with didn't do this. I've never seen it mentioned in any guitar building book, it's optional.
Here's reference of typical guitar sizes. https://www.martinguitar.com/featuresma ... etype.html
Last edited by John Platko on Oct 07, 2015 3:45 pm, edited 1 time in total.
I like to imagine ...
-
John Platko - THREAD STARTER
- Name: John Platko
- Posts: 9411
- Country: US
Re: Building a Steel String Guitar
#7 ![]() by John Platko » Oct 07, 2015 2:53 pm
by John Platko » Oct 07, 2015 2:53 pm
Here's a couple of videos of Bob Taylor talking about how top wood is harvested and cut for use which you may find interesting.
https://www.youtube.com/watch?v=5EpVIEyYiSs
https://www.youtube.com/watch?v=1DTY2bUoxwo
https://www.youtube.com/watch?v=5EpVIEyYiSs
https://www.youtube.com/watch?v=1DTY2bUoxwo
I like to imagine ...
-
John Platko - THREAD STARTER
- Name: John Platko
- Posts: 9411
- Country: US
Re: Building a Steel String Guitar
#8 ![]() by Sendraks » Oct 07, 2015 3:34 pm
by Sendraks » Oct 07, 2015 3:34 pm
Cheers John! 
"One of the great tragedies of mankind is that morality has been hijacked by religion." - Arthur C Clarke
"'Science doesn't know everything' - Well science knows it doesn't know everything, otherwise it'd stop" - Dara O'Brian
"'Science doesn't know everything' - Well science knows it doesn't know everything, otherwise it'd stop" - Dara O'Brian
-
Sendraks - Name: D-Money Jr
- Posts: 15260
- Age: 107
- Country: England
Re: Building a Steel String Guitar
#9 ![]() by John Platko » Oct 08, 2015 11:53 am
by John Platko » Oct 08, 2015 11:53 am
Jointing the plates using a shooting board
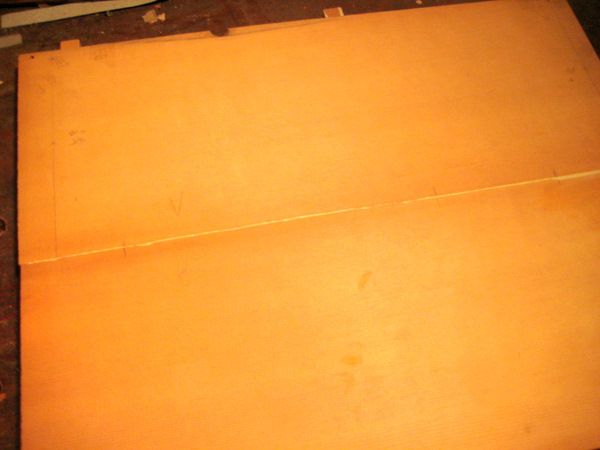
It's traditional for guitars to use book matched wood for the top and back plates. Book matched means that a thick piece of wood is sliced in half and opened up like a book. The result is a symmetrical grain and figure pattern on both sides of the center seem.
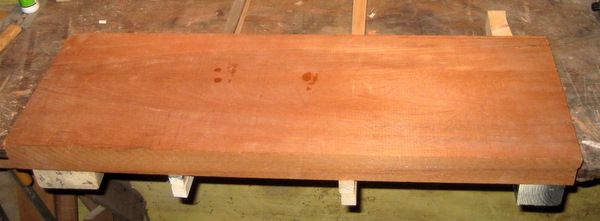
This is a rather homely set of cedar that I'll be using. It was purchased already book matched.
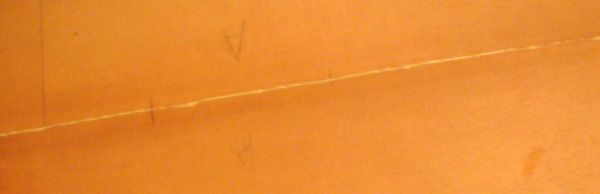
Before the plates are glued together they must be “jointed”. This process cuts a straight edge on both surfaces of the wood at the center seem. The center seem endures a lot of stress over the life of the guitar so it's important for this joint to be made well.
Planed surfaces make better glue joints than scraped surfaces and scraped surfaces make better glue joints than sanded surfaces. So, we want to plane the center seem joint.
A “shooting” board is an ancient and still very good way to joint the center seam. You can build a more permanent version but here's one made from a few pieces of wood I have on hand.
I start with a base of some “risers” to lift the shooting board off the bench so there's a place for clamps to work.
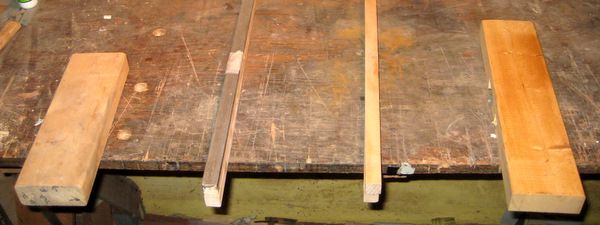
Next a flat surface goes on the risers. The plane will ride on this surface. I'll call it the plane rail.
Next a flat surface goes on the plane rail. This board elevates the top a bit from the plane rail so that the plane blade is fully contacting the guitar top. I'll call this the top riser.
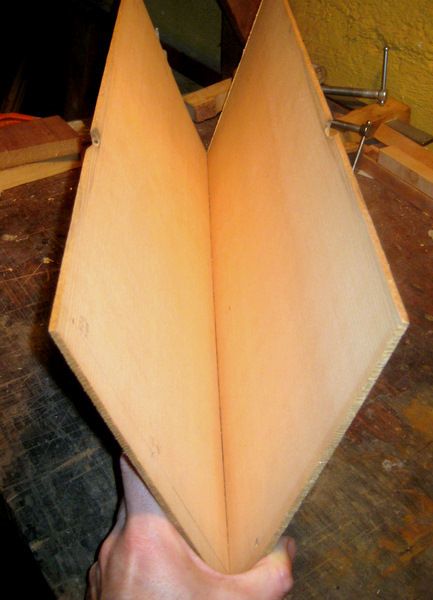
The top goes on next. I mark the surfaces so that I can keep track of the book match.

I also dowel the tops together at a couple of points that is in waste area of the wood. This allows the setup to be taken apart and the joint tested and then returned to exactly where it was. This needs to be done carefully so as to not split the wood.
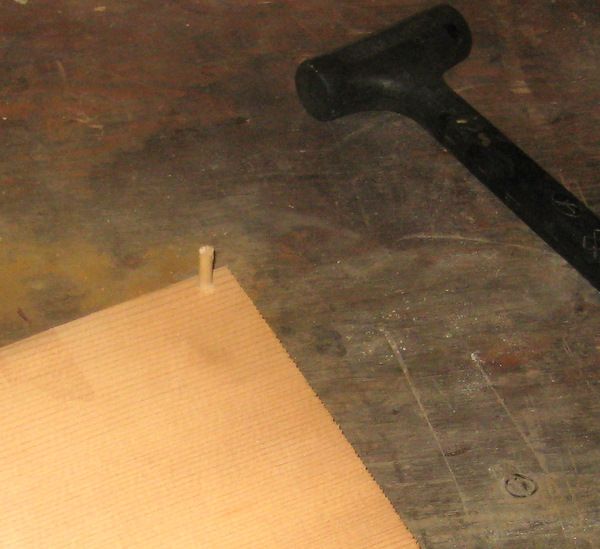
The top on the top riser. The edge of the top overhangs the riser a bit, about 1/8”.

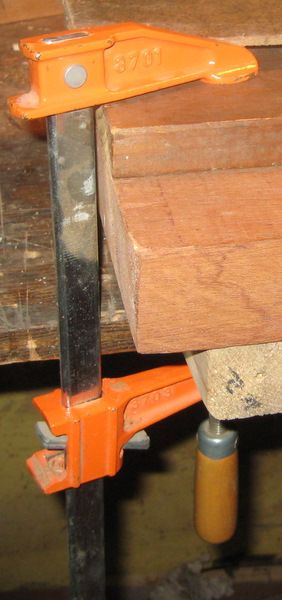
Next I use a piece of flat wood that acts as a camping cawl to help distribute the force of the clamps across the surface of the wood. Finally some clamps across the whole board and we're good to go.
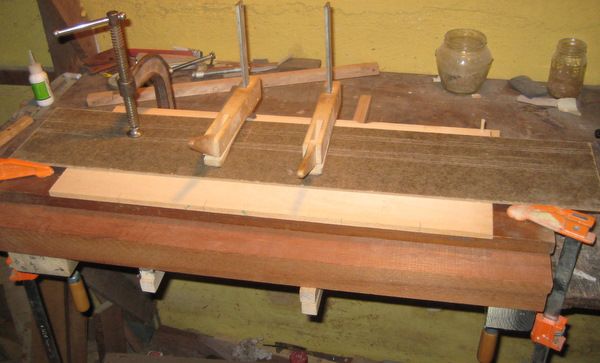
Also clamp the whole shooting board assembly to the bench.
All that's left is to pass a plane across the surface of the top until a full curl is cut from both halves of the top. There are very long jointer planes that are more suited for this job but with a bit of practice you can make a fine joint with a number 4 plane. I'm using a number 5 plane. I put a bit more pressure on the toe of the plane as I start the cut and end with a bit more pressure on the heel.
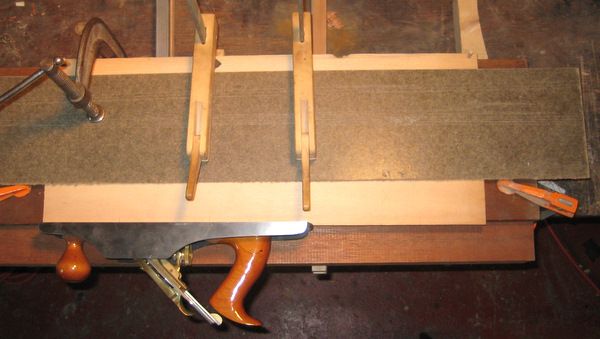
After you think you have a good joint remove the boards and check your result. I like to hold the boards against each other on a flat surface. Some like to hold the boards together with a light source behind them looks for “light leaks”, this is known as candling. Take your time inspecting the joint, it takes some practice to know what you're looking for. If the joint isn't perfect, try again concentrating on the area that needs attention. It's not uncommon for me to take the board out and inspect it 4 or 5 times until I'm happy with the joint.

It's traditional for guitars to use book matched wood for the top and back plates. Book matched means that a thick piece of wood is sliced in half and opened up like a book. The result is a symmetrical grain and figure pattern on both sides of the center seem.
This is a rather homely set of cedar that I'll be using. It was purchased already book matched.

Before the plates are glued together they must be “jointed”. This process cuts a straight edge on both surfaces of the wood at the center seem. The center seem endures a lot of stress over the life of the guitar so it's important for this joint to be made well.
Planed surfaces make better glue joints than scraped surfaces and scraped surfaces make better glue joints than sanded surfaces. So, we want to plane the center seem joint.
A “shooting” board is an ancient and still very good way to joint the center seam. You can build a more permanent version but here's one made from a few pieces of wood I have on hand.
I start with a base of some “risers” to lift the shooting board off the bench so there's a place for clamps to work.

Next a flat surface goes on the risers. The plane will ride on this surface. I'll call it the plane rail.

Next a flat surface goes on the plane rail. This board elevates the top a bit from the plane rail so that the plane blade is fully contacting the guitar top. I'll call this the top riser.

The top goes on next. I mark the surfaces so that I can keep track of the book match.

I also dowel the tops together at a couple of points that is in waste area of the wood. This allows the setup to be taken apart and the joint tested and then returned to exactly where it was. This needs to be done carefully so as to not split the wood.

The top on the top riser. The edge of the top overhangs the riser a bit, about 1/8”.

Next I use a piece of flat wood that acts as a camping cawl to help distribute the force of the clamps across the surface of the wood. Finally some clamps across the whole board and we're good to go.

Also clamp the whole shooting board assembly to the bench.

All that's left is to pass a plane across the surface of the top until a full curl is cut from both halves of the top. There are very long jointer planes that are more suited for this job but with a bit of practice you can make a fine joint with a number 4 plane. I'm using a number 5 plane. I put a bit more pressure on the toe of the plane as I start the cut and end with a bit more pressure on the heel.

After you think you have a good joint remove the boards and check your result. I like to hold the boards against each other on a flat surface. Some like to hold the boards together with a light source behind them looks for “light leaks”, this is known as candling. Take your time inspecting the joint, it takes some practice to know what you're looking for. If the joint isn't perfect, try again concentrating on the area that needs attention. It's not uncommon for me to take the board out and inspect it 4 or 5 times until I'm happy with the joint.

I like to imagine ...
-
John Platko - THREAD STARTER
- Name: John Platko
- Posts: 9411
- Country: US
Re: Building a Steel String Guitar
#10 ![]() by Spearthrower » Oct 08, 2015 1:23 pm
by Spearthrower » Oct 08, 2015 1:23 pm
I'm going to read this with interest, but just a thought John - have you considered doing this by video on Patreon or YT?
I'm not an atheist; I just don't believe in gods :- that which I don't belong to isn't a group!
Religion: Mass Stockholm Syndrome
Learn Stuff. Stuff good. https://www.coursera.org/
Religion: Mass Stockholm Syndrome
Learn Stuff. Stuff good. https://www.coursera.org/
-

Spearthrower - Posts: 33854
- Age: 47
- Country: Thailand
Re: Building a Steel String Guitar
#11 ![]() by John Platko » Oct 08, 2015 2:45 pm
by John Platko » Oct 08, 2015 2:45 pm
Spearthrower wrote:I'm going to read this with interest, but just a thought John - have you considered doing this by video on Patreon or YT?
Video would be nice. These days there are a lot of tutorials already on youtube so I probably won't make one. But it'll be easy enough for me to add a link that shows someone doing something similar to the step I'm on at for those who want to watch the action.
Here's a shooting board tutorial:
There are lots of similar examples. Although I noticed one guy used sandpaper with his plane for a better fit.
I like to imagine ...
-
John Platko - THREAD STARTER
- Name: John Platko
- Posts: 9411
- Country: US
Re: Building a Steel String Guitar
#12 ![]() by John Platko » Oct 09, 2015 1:23 pm
by John Platko » Oct 09, 2015 1:23 pm
Gluing the plates together
The plates should be glued together right after they are jointed because a fresh planed edge gives the best glue joint.
I use Titebond for this joint instead of hide glue mostly because that's the way I originally learned how to do it and I've never wanted to experiment on this joint because if it fails on you your pretty much sol. Also, the really nice features of hot hide glue, it cleans up nicely and you can reactivate it if you need to re-glue something are not important here. I imagine hot hide glue would work just fine though. If I were using hot hide glue here I would use a heat lamp to warm the boards before glue to get the best possible joint.
Here's what I use for the job.
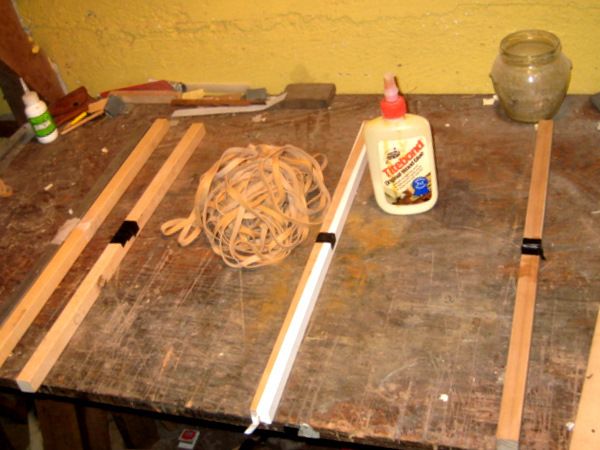
Besides the Titebond, 5 hardwood sticks and about 50 large rubbers.
The sticks have tiny slots cut in the center to help prevent the sticks from being glued to the soundboard. I also put some plastic tape or wax paper at that point just to make sure.
I put three sticks down on the bench with two spaced near the ends of the soundboards and one in the middle. Like so:
I put a healthy bead of glue on one board, maybe not quite this healthy, and use this board as an applicator to put glue on the other board.
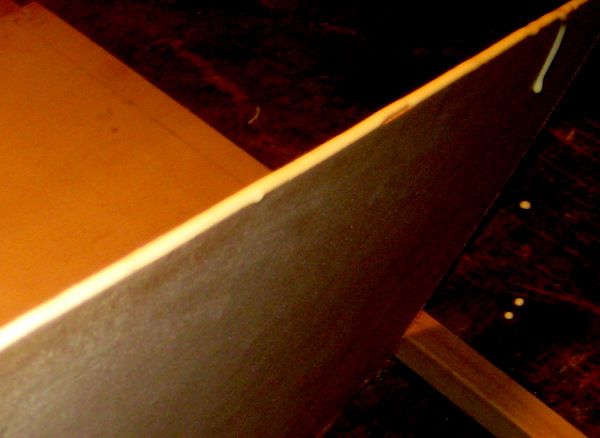
All this happens pretty fast but I lay both boards down on the three sticks, making sure the seem is at the center of the boards. I press the boards together and flat on the sticks. Rub them horizontally against each other a few times to help spread the glue. Make sure the seam is fairly flat against the sticks again, make sure my marks line up and an the correct sides of the boards are being glued.
Do a quick wipe with a damp paper towel to get the bulk of the squeeze out.
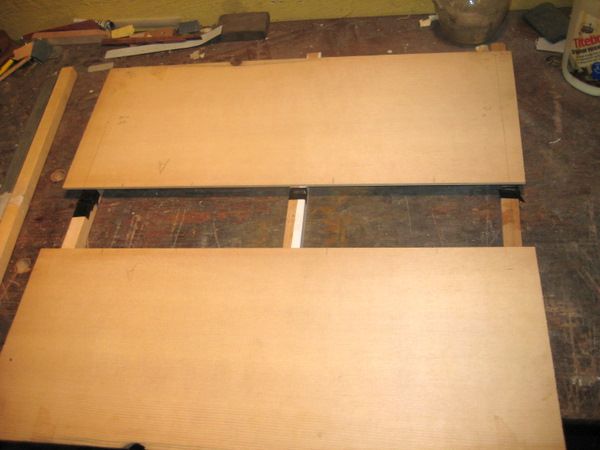
And start putting on rubber bands. I put about 3 on at a time on each stick until I get six bands on each stick. Then I slip the remaining two sticks under the boards in between the other three. Turn the soundboards with the attached 3 sticks around and center them on the two remaining sticks. This is a good time for a quick wipe of glue on this side.
I add rubber bands to these sticks now. Until I get about 10 on each stick.
Turn the whole thing around one more time and finish adding rubber bands to the original three sticks until I have about 10 on each of them.
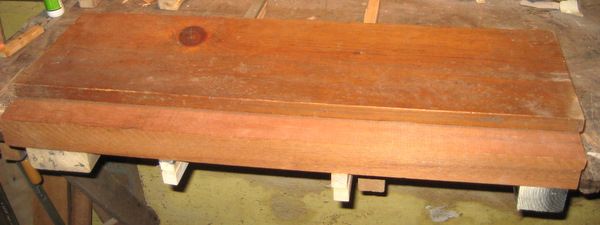
You should be fairly quick about all of this, and end up with something like:
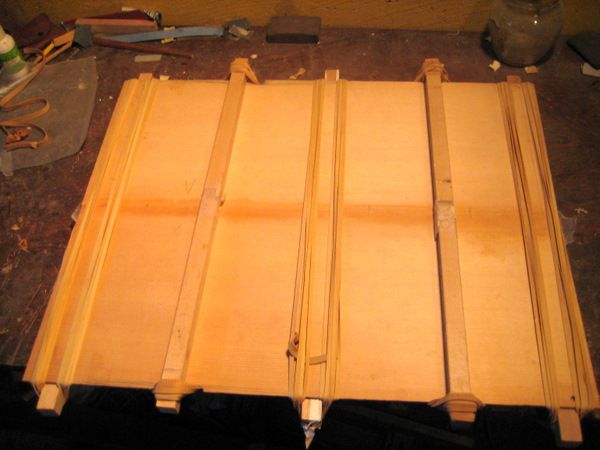
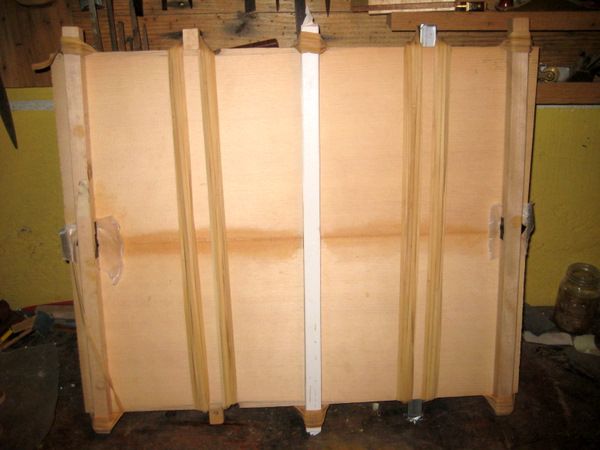
The advantages of this over using pipe clamps or some such thing is that it prevents you from putting too much pressure on the soft soundboard while putting enough pressure to get the job done. The wood doesn't tend to buckle up a at the center. The sticks keep everything aligned. It adapts to all size boards and they can be irregularly shaped, which is sometimes the case for exotic hardwoods. There's not much of a jig to make and it's easy to store. Seven sticks might be a slight improvement over 5.
This rubber technique is an adaption of an older technique that used string and a wedge tensioner instead of rubber bands.
The plates should be glued together right after they are jointed because a fresh planed edge gives the best glue joint.
I use Titebond for this joint instead of hide glue mostly because that's the way I originally learned how to do it and I've never wanted to experiment on this joint because if it fails on you your pretty much sol. Also, the really nice features of hot hide glue, it cleans up nicely and you can reactivate it if you need to re-glue something are not important here. I imagine hot hide glue would work just fine though. If I were using hot hide glue here I would use a heat lamp to warm the boards before glue to get the best possible joint.
Here's what I use for the job.

Besides the Titebond, 5 hardwood sticks and about 50 large rubbers.
The sticks have tiny slots cut in the center to help prevent the sticks from being glued to the soundboard. I also put some plastic tape or wax paper at that point just to make sure.
I put three sticks down on the bench with two spaced near the ends of the soundboards and one in the middle. Like so:

I put a healthy bead of glue on one board, maybe not quite this healthy, and use this board as an applicator to put glue on the other board.

All this happens pretty fast but I lay both boards down on the three sticks, making sure the seem is at the center of the boards. I press the boards together and flat on the sticks. Rub them horizontally against each other a few times to help spread the glue. Make sure the seam is fairly flat against the sticks again, make sure my marks line up and an the correct sides of the boards are being glued.


Do a quick wipe with a damp paper towel to get the bulk of the squeeze out.
And start putting on rubber bands. I put about 3 on at a time on each stick until I get six bands on each stick. Then I slip the remaining two sticks under the boards in between the other three. Turn the soundboards with the attached 3 sticks around and center them on the two remaining sticks. This is a good time for a quick wipe of glue on this side.
I add rubber bands to these sticks now. Until I get about 10 on each stick.
Turn the whole thing around one more time and finish adding rubber bands to the original three sticks until I have about 10 on each of them.
You should be fairly quick about all of this, and end up with something like:


The advantages of this over using pipe clamps or some such thing is that it prevents you from putting too much pressure on the soft soundboard while putting enough pressure to get the job done. The wood doesn't tend to buckle up a at the center. The sticks keep everything aligned. It adapts to all size boards and they can be irregularly shaped, which is sometimes the case for exotic hardwoods. There's not much of a jig to make and it's easy to store. Seven sticks might be a slight improvement over 5.
This rubber technique is an adaption of an older technique that used string and a wedge tensioner instead of rubber bands.
I like to imagine ...
-
John Platko - THREAD STARTER
- Name: John Platko
- Posts: 9411
- Country: US
Re: Building a Steel String Guitar
#13 ![]() by Spearthrower » Oct 09, 2015 2:57 pm
by Spearthrower » Oct 09, 2015 2:57 pm
John Platko wrote:Although I noticed one guy used sandpaper with his plane for a better fit.
Unfortunately, this is as opaque as an in-joke on the Eleusinian Mysteries to me.... does it affect the vibration of the sound box?
I'm not an atheist; I just don't believe in gods :- that which I don't belong to isn't a group!
Religion: Mass Stockholm Syndrome
Learn Stuff. Stuff good. https://www.coursera.org/
Religion: Mass Stockholm Syndrome
Learn Stuff. Stuff good. https://www.coursera.org/
-
Spearthrower - Posts: 33854
- Age: 47
- Country: Thailand
Re: Building a Steel String Guitar
#14 ![]() by John Platko » Oct 09, 2015 3:36 pm
by John Platko » Oct 09, 2015 3:36 pm
It was a quiz of sorts.
From: http://www.rationalskepticism.org/music ... l#p2311981
Planed surfaces make better glue joints than scraped surfaces and scraped surfaces make better glue joints than sanded surfaces. So, we want to plane the center seem joint.
does it affect the vibration of the sound box?
No, it's just that sanded joints don't create as good a glue joint as a freshly planed joint. See page 3 for more details.
I like to imagine ...
-
John Platko - THREAD STARTER
- Name: John Platko
- Posts: 9411
- Country: US
Re: Building a Steel String Guitar
#15 ![]() by Spearthrower » Oct 09, 2015 3:47 pm
by Spearthrower » Oct 09, 2015 3:47 pm
No fair! You said 'scraped' not 'sanded'! 
You can't say I didn't warn you in advance about my technical capabilities!
You can't say I didn't warn you in advance about my technical capabilities!
I'm not an atheist; I just don't believe in gods :- that which I don't belong to isn't a group!
Religion: Mass Stockholm Syndrome
Learn Stuff. Stuff good. https://www.coursera.org/
Religion: Mass Stockholm Syndrome
Learn Stuff. Stuff good. https://www.coursera.org/
-
Spearthrower - Posts: 33854
- Age: 47
- Country: Thailand
Re: Building a Steel String Guitar
#16 ![]() by John Platko » Oct 09, 2015 4:05 pm
by John Platko » Oct 09, 2015 4:05 pm
Spearthrower wrote:No fair! You said 'scraped' not 'sanded'!
You can't say I didn't warn you in advance about my technical capabilities!
Yes but I thought you could handle:
Planed surfaces make better glue joints than scraped surfaces and scraped surfaces make better glue joints than sanded surfaces.
A) Planed better than scraped.
B) Scraped better than sanded.
Therefore, Planed better than sanded.
Of course, your plane blade has to be sharp for this to be true. And sharpening tools is a long story all by itself.
Of course I did assume that folks know what a scraped surface is and there's no reason that should be true. Scraping will be described as we get further down the road as it is an important technique.
Here's what I mean by scraping.
I like to imagine ...
-
John Platko - THREAD STARTER
- Name: John Platko
- Posts: 9411
- Country: US
Re: Building a Steel String Guitar
#17 ![]() by Alan B » Oct 09, 2015 4:23 pm
by Alan B » Oct 09, 2015 4:23 pm
Now, I know nothing about this subject but it is interesting, none the less.
Might I suggest that you are consistent with your measurement units? And is 200 degrees C or F? (200C seems rather hot .)
.)
Something I picked up recently about Strad. violins where it has been discovered that the wood he used was from a period of slow growth for the tree - little rainfall, dense wood (tree rings close together). This apparently gives rise to the unique sound of the Strad. Would this affect your choice of woods?
Might I suggest that you are consistent with your measurement units? And is 200 degrees C or F? (200C seems rather hot
.)Something I picked up recently about Strad. violins where it has been discovered that the wood he used was from a period of slow growth for the tree - little rainfall, dense wood (tree rings close together). This apparently gives rise to the unique sound of the Strad. Would this affect your choice of woods?
I have NO BELIEF in the existence of a God or gods. I do not have to offer evidence nor do I have to determine absence of evidence because I do not ASSERT that a God does or does not or gods do or do not exist.
-

Alan B - Posts: 9999
- Age: 87
- Country: UK (Birmingham)
")
Re: Building a Steel String Guitar
#18 ![]() by John Platko » Oct 09, 2015 6:29 pm
by John Platko » Oct 09, 2015 6:29 pm
Alan B wrote:Now, I know nothing about this subject but it is interesting, none the less.
Might I suggest that you are consistent with your measurement units? And is 200 degrees C or F? (200C seems rather hot
The top is baked to 200 degrees F.
Although when we get to bending sides, the temp goes up to about 340 degrees F.
I'll try to use just F.
But I will do some mixing of measurement systems for dimensions. Since this is a steel string guitar- I'll mostly use inches except for plate thickness which I'm more accustomed to talk about in millimeters. But I'll make sure units are specified.
Something I picked up recently about Strad. violins where it has been discovered that the wood he used was from a period of slow growth for the tree - little rainfall, dense wood (tree rings close together). This apparently gives rise to the unique sound of the Strad. Would this affect your choice of woods?
Old growth wood, a tree growing in an existing forest, had to compete with all the other trees that were already in forest, so it grew more slowly and has tighter ring spacing. Weather conditions also have a big effect on growth. They can date wood by it's ring spacing. Clear cutting and replanting results in wider ring spacing.
There are myths about tighter grained tops having better stiffness to weight ratios but folks who have measured a lot of tops have demonstrated that the myth isn't true. All things being equal they claim the opposite is true. I think all that can be said for sure is that tighter grained tops grew slower and cost more - although I find tighter grained tops nicer to look at.
Was a reason given as to why the tight grained wood Strad used had a better sound?
I used a cheap top on this guitar, it was a bit of an experiment to do so and I liked the way it blended with the back and side wood I wanted to use. I don't think it hurt the sound. But it is a really good idea to use well quartered top wood with a very vertical grain running the length of the board without run out.
This gives a good description on the various cuts of top wood.
The world of stringed instruments, from Strads to electric guitars, has every bit as much woo as any religion.
I like to imagine ...
-
John Platko - THREAD STARTER
- Name: John Platko
- Posts: 9411
- Country: US
Re: Building a Steel String Guitar
#19 ![]() by Alan B » Oct 09, 2015 7:24 pm
by Alan B » Oct 09, 2015 7:24 pm
John Platko wrote:Was a reason given as to why the tight grained wood Strad used had a better sound?
Not that I can remember. But it was a fairly recent 'discovery' so there's probably a reference somewhere.
The world of stringed instruments, from Strads to electric guitars, has every bit as much woo as any religion.
I'm inclined to agree - there's a lot subjective opinions doing the rounds in these subjects.
Rather like the nonsense about 'HiFi' speaker cables - power cables are just as good...
(But I don't want to drift OT).
Last edited by Alan B on Oct 09, 2015 7:26 pm, edited 1 time in total.
I have NO BELIEF in the existence of a God or gods. I do not have to offer evidence nor do I have to determine absence of evidence because I do not ASSERT that a God does or does not or gods do or do not exist.
-
Alan B - Posts: 9999
- Age: 87
- Country: UK (Birmingham)
Re: Building a Steel String Guitar
#20 ![]() by Spearthrower » Oct 09, 2015 7:25 pm
by Spearthrower » Oct 09, 2015 7:25 pm
John Platko wrote:Of course I did assume that folks know what a scraped surface is and there's no reason that should be true. Scraping will be described as we get further down the road as it is an important technique.
One assumption too far with me, I'm afraid.
I did CDT (craft, design, technology) when I was a teenager, and have mostly avoided ever having to build something again. I am better at taking things apart, or building stuff with my mind (creative).
I'm not an atheist; I just don't believe in gods :- that which I don't belong to isn't a group!
Religion: Mass Stockholm Syndrome
Learn Stuff. Stuff good. https://www.coursera.org/
Religion: Mass Stockholm Syndrome
Learn Stuff. Stuff good. https://www.coursera.org/
-
Spearthrower - Posts: 33854
- Age: 47
- Country: Thailand
Return to Technical Design and Engineering.
Who is online
Users viewing this topic: No registered users and 2 guests