Building a Steel String Guitar

a step by step show and tell

Architecture, graphic design, your projects.

Moderators: kiore, Blip, The_Metatron

Re: Building a Steel String Guitar

#121  Postby John Platko » Nov 16, 2015 1:53 pm

Making kerfed linings and tentellones

Time to make some more of the bits that go with the sides. I'll start with the linings. Now that the sides are only about 2mm thick (and we're going to cut that away when we route for the bindings) we need something to keep the top and back attached to the sides- that's the job of the linings.

Common wood for linings are: mahogany, basswood, and Spanish Cedar, which is what Martin uses and what I'll be using. Spanish cedar is light and it smells nice too. Willow is common lining for violins and also a fine choice- but it doesn't smell all that great. Willow is what my teacher liked - I imagine he got that idea from his teacher.

You can buy all sorts of shapes of linings (also known as kerfings) made from different woods from places like this.


Image

Traditional Martin linings looks like: (the lining are the triangular pieces of wood near the top and bottom of the sides going all around the guitar.)

Image

I'm going to use some traditional lining techniques but some people also use solid linings - which you heat bend to shape or laminate. And there's a "new" reverse binding technique where you put kerfed linings on backwards in an effort to add more stiffness to the sides. The structure that results has a bit of an I beam effect. Some claim this is a marvelous improvement. :scratch: But if super stiff sides is what you want then why not just laminate some plywood sides and make them very stiff. :dunno:. Reversed linings look like:

Image

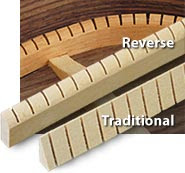
I start by slicing a pieces of Spanish cedar on a bandsaw that is about as wide as I have on hand a bit more than 3/4" thick and then using a safety planer to bring it down to 3/4". Then, I cut that into logs that are 3/4” x 5/16”. You can continue using power tools to make the linings, a table saw or band saw can be used but I'll be using hand tools from this point on.

On the left is the rough cut lining logs and on the right is the simple jig that I use to plane the log to their final shape.

Image

The logs were planed to their final height with the safety planer and a few passes of a hand plane before they were cut. Now they are placed into a simple jig with spacers built in for the correct width of the lining. About 1/4".

Image

Then I plane the part of the log that's higher than the jig.

Image

Image

Here's another type of plane that works well for this job.

Image

Now the height and width are set and both surfaces have been planed, not cut.

Image

Then I transfer the log into the other side of the jig which hold it at an angle so a facet can be planed on the edge.

Image

Once again, plane until the jig spacers are reached.

Image

The final profile of the lining. I prefer this to a triangle but that will also work as is a bit easier to make with power tools.
Pardon my out of focus pictures.

Image

Image

Image

A bunch of logs are made. (on the right)

Image
I like to imagine ...
User avatar
John Platko
THREAD STARTER
 
Name: John Platko
Posts: 9411
Male

Country: US
United States (us)
Print view this post

Re: Building a Steel String Guitar

#122  Postby John Platko » Nov 17, 2015 1:56 pm

Making Tenetllones and Kerfed linings

Traditionally classical guitar makers used many individual pieces of wood, called tenetllones, to glue the top to the sides. And I'm going to do the same here.

Tentellones are a key part of my construction technique and work well with using a solera. Tentellones come from the Spanish tradition. You can of course, use kerfed linings for the top - side joint and most steel string guitars do.

Starting with the shaped logs that were previously made.

Image


I use a simple miter box made from scrap wood to cut the tentellones. (Here's a tip, you can make in simple jig like this very quickly by using super glue to join the pieces of wood.)

Image

If my fingers get tired holding the log I use a clamp.

Image

The first few tentellones.

Image

All the tentellones cut. I save a few wider pieces at the end of each log and use them to cut custom pieces that go over braces.

Image

I use kerfed lining to glue the back to the sides. In classical guitar construction, solid lining is often used there.

I use another simple jig made of scrap wood to cut the kerfing. One line is used as a guide for how far to slide the lining over for the next cut. the other line is for the blade. The piece of veneer in the back acts as a crude depth of cut stop. The kerfs or saw blade cuts make the wood flexible so you can bend it to conform to the shape of the sides. As we will see kerfed lining is to tantellones what a clip of bullets is to individual bullets.

Image

Use the widest blade you can find. I'm using two blades ganged together here but three would be better.

Image

I don't make my kerfing very flexible, instead I use a hot pipe to bend them to their final shape. If you prefer, go a bit deeper and they'll go right in place. A bandsaw or a table saw is a more normal route for making kerfed linings - they come out of a factory tradition.

Image

A clamp can help hold the lining in place near the end of the log.

Image

Image

The finished lining.

Image

Image
I like to imagine ...
User avatar
John Platko
THREAD STARTER
 
Name: John Platko
Posts: 9411
Male

Country: US
United States (us)
Print view this post

Re: Building a Steel String Guitar

#123  Postby laklak » Nov 17, 2015 3:44 pm

Is there a reason you make your own instead of buying the pre-cut ones, other than you just like making them?
A man who carries a cat by the tail learns something he can learn in no other way. - Mark Twain
The sky is falling! The sky is falling! - Chicken Little
I never go without my dinner. No one ever does, except vegetarians and people like that - Oscar Wilde
User avatar
laklak
RS Donator
 
Name: Florida Man
Posts: 20878
Age: 70
Male

Country: The Great Satan
Swaziland (sz)
Print view this post

Re: Building a Steel String Guitar

#124  Postby John Platko » Nov 17, 2015 4:47 pm

laklak wrote:Is there a reason you make your own instead of buying the pre-cut ones, other than you just like making them?


I never saw tentellones for sale - hmmm I wonder If anyone sells them. :scratch:

But to the point of your question, there's no real reason not to buy kerfed linings other than I'm going for a hand crafted guitar and it's a bit less so if you start buying factory made parts. There's nothing wrong with the kerfed linings you can buy from a place like LMII, Martin guitar, Stewmac, etc.. (I even tried their fancy reversed kerfed linings in one guitar.) And you can buy abalone rosettes, and premade binding, and slotted fingerboards, and ... - you can even buy kits with pre-bent sides. Basically you can choose your level of pain satisfaction.

I don't make the tuners, the bridge pins, or the strings. Sometimes I cheat and buy side dots, but usually I make those too.

I think part of this goes back to the way my teacher approached building. And part of it is that I like developing skill working with my hands, and materials; and trying to do precision work with simple tools and aids. And I like trying to simplify the process. The method for making kerfed linings and tantellones is nothing like the method my teacher taught me- which involved a lot of bandsaw time.
I like to imagine ...
User avatar
John Platko
THREAD STARTER
 
Name: John Platko
Posts: 9411
Male

Country: US
United States (us)
Print view this post

Re: Building a Steel String Guitar

#125  Postby John Platko » Nov 18, 2015 2:08 pm

Fitting and attaching the top to the sides

I start assembling the sound box by attaching the top to the sides. Doing it this way is integral to my approach to building and it follows the Spanish tradition. For steel string guitars some prefer to attach the top last. I believe this is because the bottom joints and glue residue are more visible - you really have to work at seeing the top joint through the sound hole. The big advantage of my technique is that the solera will beholding the important top angles in line.

Here's a tool that I'll be using more now. Spool clamps. They're very easy to make yourself.

Image

The clamps hold the top to the sides while I check out the exact placement that I want.

Image

Make sure the center seam of the top lines up with the center seam of the sides. Don't clamp the spool clamps too tightly at this point, especially where various top structures are keeping the top from make good contact with the sides. (That's a pencil mark on my seam - it's not easy to see without a mark.)

Image

It looks pretty good from the inside too. I need to trim back the heel chin a bit, I don't like it touching the traverse brace. Some folks who use a chin put it right up against the traverse brace with the thought that it may keep the heel from rotating under string pressure, it might but I feels that locks the whole guitar together tighter than I want it to be.

Image

Next I mark where the X and traverse brace ends need to be cut. A hair short of the sides allows a bit of room for movement with changes in humidity. (It's nice to see that I used an edge here. ;) )

Image

Image

Image

A small saw to make the cut, taking care not to nick the soundboard.

Image

And chisel out the wood. I guess I was creeping up on that mark. :dunno:

Image

Check the fit.

Image

Here's the hair of a gap I was talking about. Some like a bit more, some none.

Image

I like to put some marks on the sides and the braces so I can get things realigned when I'm gluing.

Image

If I were using kerfed linings for the top to side joint I would add them now following the steps shown for gluing kerfed lining on the back side joint (which we'll see later), leveling them to the sides, and in-letting the braces into them.

I use hot hide glue here, again if something goes wrong it's easy to fix with hide glue.

Some glue, clamps, and we're done.

Image

Image
I like to imagine ...
User avatar
John Platko
THREAD STARTER
 
Name: John Platko
Posts: 9411
Male

Country: US
United States (us)
Print view this post

Re: Building a Steel String Guitar

#126  Postby John Platko » Nov 19, 2015 1:33 pm

Gluing on the tentellones

Next I add small blocks all along the rim to connect the top to the sides. It's far more common to use kerfed linings for this operation on steel string guitars but the individual blocks is an old traditional technique that I like because it fits well with my solera construction style. Way back Martin used individual blocks too, but by the time pre-war steel strings came along they were using kerfed lining. I'll be using kerfed linings for the back so it will be easy to see how that works and how that can be applied to the top also.

I use this burnisher to help install the blocks. Anything with a fairly sharp point can be used.

Image

The tip of the burnisher is pressed into the block.

Image

And the block sticks to the end of the burnisher.

Image

Hide glue is used for this operation. Hide glue pulls the joint tight as it dries. I brush some hide glue on the top and sides for a small area that I'll be working on.

Image

Brush some hide glue on the block.

Image

And press in place.

Image

I like to start around a major brace , blocking it in, and then continue around the sides with more space between the blocks.

Image

Image

Image

Image

A small sick can be used to help hold a block in place.

Image

One upper bout done.

Image
I like to imagine ...
User avatar
John Platko
THREAD STARTER
 
Name: John Platko
Posts: 9411
Male

Country: US
United States (us)
Print view this post

Re: Building a Steel String Guitar

#127  Postby John Platko » Nov 20, 2015 1:50 pm

Gluing on the tentellones - continued

Starting the lower bout where the X brace meets the side.

Image

Image

One lower bout finished. Notice that I leave a small gap between the tailblock and the nearest tentellone.

Image

Starting the other upper bout.

Image

Image

And that bout is done. (I wipe the surface with a warm damp rag to get up what glue mess I can.)

Image

Starting the second lower bout.

Image

Image

That's done.

Image

All that's left is the waist.

Image

Image

And now it's all done.

Image
I like to imagine ...
User avatar
John Platko
THREAD STARTER
 
Name: John Platko
Posts: 9411
Male

Country: US
United States (us)
Print view this post

Re: Building a Steel String Guitar

#128  Postby John Platko » Nov 21, 2015 1:46 pm

Gluing on the kerfed linings

After checking that the profile of the sides is still the correct shape and making any corrections that are necessary it's time to glue on the kerfed linings.

Store bought kerfings are a bit more flexible then the ones I cut myself by hand. It's not hard to make your own linings just as flexible if that's what you decide to do. I don't try to put these in in one piece per side but instead I use three. It's easier to handle three pieces and they adjust better to the spherical contour of the sides. Also, you don't need to be as fast with the glue and clamps.

I use a bending iron to help get them to the final shape, it doesn't take much to get them to match the shape of the sides.

Image

A little more and it'll be there.

Image

Here's an important tool for this operation. The added rubber band gives a bit more clamping pressure.

Image

It takes more than one.

Image

I do a dry fit around the whole rim.

Image

Image

Image

This is another place where I use hot hide glue. I put glue on the sides. Neater is better :oops:

Image

And glue on the linings.

Image

Image

And lots of clamps and it's done. The linings should extend above the sides a bit, we'll trim them back next.

Image
I like to imagine ...
User avatar
John Platko
THREAD STARTER
 
Name: John Platko
Posts: 9411
Male

Country: US
United States (us)
Print view this post

Re: Building a Steel String Guitar

#129  Postby John Platko » Nov 22, 2015 1:50 pm

Trimming the linings.

After the glue dries trim the linings to match the shape of the back. I mostly use a block plane for this. A very slight angle might better match the arch but for such a small area, flat is fine. You just don't want to angle the linings away from the spherical shape.

Image

A bit of sandpaper on the arching tool is a good cheat (although bad form) for this job. But it might help to give the idea of what kind of angle is needed for the lining to arch correctly - and then a hand plane can be used to complete the job.

Image

Sealing the side reinforcements.


After the back linings are on I like to put a few coats of shellac over the side reinforcements to help seal the glue a bit.

Image

I paint it on. It's not traditional or necessary to put finish on the whole interior of the guitar. Although some builders, do put finish of some sort on the inside. But it's not a Martin or Taylor thing.

Image
I like to imagine ...
User avatar
John Platko
THREAD STARTER
 
Name: John Platko
Posts: 9411
Male

Country: US
United States (us)
Print view this post

Re: Building a Steel String Guitar

#130  Postby Onyx8 » Nov 22, 2015 5:11 pm

what does sealing the glue do? Isn't the glue itself a sealant?
The problem with fantasies is you can't really insist that everyone else believes in yours, the other problem with fantasies is that most believers of fantasies eventually get around to doing exactly that.
User avatar
Onyx8
Moderator
 
Posts: 17520
Age: 67
Male

Canada (ca)
Print view this post

Re: Building a Steel String Guitar

#131  Postby John Platko » Nov 22, 2015 5:50 pm

Onyx8 wrote:what does sealing the glue do? Isn't the glue itself a sealant?


What I was taught by Al Carruth is that hide glue exposed to air breaks down over time. That's one reason why it's important for hide glue joints to be very tight. The side strip cloth is just saturated in hide glue and exposed to air on one side. The idea is that that the shellac coating will act as a barrier. "Sealing" is a word that is used more than one way. Perhaps I should call this step putting finish over the exposed hide glue to protect it.

I suspect the kind of hide glue sealing you're talking about has the function of either, sealing the wood so that pore fillers don't stain the wood, and/or providing a thin prep coat finish so that the top coat finish has something that it sticks to better.

But I never investigated this on my own - I'm just going by what Al said, but he is an expert on this sort of thing. I haven't talked to Al in a while but it looks like he's still doing it this way.

from

Alan Carruth02-26-2014, 03:49 PM
I've done the experiment.

When you push inward on the side the material in the inside face is placed under tension. Wood is not very strong at resisting this and tends to crack, starting on the inside face. A tape that's solidly glued down adds a lot of strength in that sense, thus increasing the force it takes to break the side.


I did experiments about 15 years ago, using two different side tape materials (nylon twill and cotton-polyester bias), and two different glues (hot hide glue and Titebond). I made standard samples of several different woods and broke them in a rig that allowed me to figure out how much force it took. What I found was:
1) any tape about doubled the force it took to break a sample,
2) hide glue is stronger than Titebond in this application,
3) although the nylon tape is a stronger material, it does not glue well, tending to come unstuck, allowing the samples to break, and
4) the cotton-poly tape tended to break with the wood, and withstood somewhat more force.

That's why I use cotton-poly side tapes glued on with hide glue. One drawback of that is that hide glue breaks down when exposed to air. I shellac the tapes cut that down: we'll know in 75 years or so whether it works.


And also from that thread:

Alan Carruth02-27-2014, 03:56 PM
Good questions.

Charles Tauber asked:
"Do you know at what pressure the sides in your test cracked? "

Some more detail:

The test was done using small coupons of side wood; either straight pieces from side that had cracked in bending, or similar bits of surplus sides. They were 40mm x 100mm, with the grain going the short way. The half inch wide tapes were put on using whichever glue, and then shellaced, to keep things as much as possible as they would be in a normal build. I made two samples of each case, including pieces with no tapes: a small sample, to be sure.

To test them I made a holder for two sections of 1/4" dowel, to hold them parallel 1" apart. The test piece was placed on them with the wood grain parallel to the supports, and the tape side down. A lever was made that had another piece of dowel parallel to the other two and centered between them. This applied pressure on the top of the wood. A can of marbles was slid down the lever until the test piece broke. The location of the can, along with the mechanical advantage of the lever and the tare (obtained with a gram scale) gave the force applied.

The average force required to break the 'bare' samples ranged from 2688 grams (mahogany 1.8mm thick) to 5640 grams (persimmon @ 2.0mm). For the reinforced samples the range went from 3500 grams (2.0mm padauk; bias tape and Titebond) to 7500 grams (persimmon and nylon tape with hide glue; a real outlier from the other data for some reason). I used 2.0mm IRW as the forth sample material. In general the stronger persimmon benefited relatively less from being reinforced, which I suppose is what you'd expect. I note that my recollection of 'about doubles the force' is inaccurate: it's more like a 30%-60% increase. Still useful, IMO, but I really need to be more careful in these posts in the future.

I suspect that real sides would require a lot more force to break. In that case it's hard to know if the tapes would add as much of an increment to the strength, although I'm sure they add some. OTOH, I do know from experience that tapes will stop an impact crack that starts in between them. It's a lot easier to repair a 4" long crack in a side than one that runs from block to block.

Jeff Crisp asked:
"How can you by sure that it was cross grain gluing that had caused the crack? What made these 2 guitars stand out from the numerous number of guitars you would have seen in your lifetime?"

These were imports 'fresh off the boat', that showed no signs of use, let alone abuse. They were made of a soft, light Australian wood (I don't know the species offhand). The cracks were held open, widest at the fillet location, and stopped a short distance away, where there was no reinforcement on the side that I can recall. I can't prove the fillets caused the cracks, but the circumstantial evidence is pretty strong.

Ben-Had asked:
"Alan, why do you choose tape over wood?"

I feel they're the best value for the time and effort involved. They do reinforce the sides against impact cracks; for which I have lots of other evidence besides the test cited. They are not 'bullet proof', of course, but I expect (and hope) that people who own a handmade guitar will make an effort to treat it with some respect, and not use it for impromptu stickball games. Stuff does happen, of course, but it's amazing how much punishment a guitar can take with a little help.

One of my pieces of evidence is a BRW 000 guitar I made for a friend. I used thin linen side tapes on that one. He plays a lot of nursing home gigs, and tends to walk around with the guitar across his back on the strap. The first time he brought it by for fret work I noticed white paint marks on the sides where he'd bumped into door frames, and these multiplied over the years. Finally, after almost 20 years of this, he managed to punch a 1" hole in the treble side of the upper bout between tapes. There was no crack running away from the hole, and it was a fairly easy repair, as such things go. I could multiply that story a bit.

Fillets need to be inletted into the liners to avoid creating a stress riser. It's a bit of trouble to do that neatly. Side tapes don't seem to interfere with the glue joint that I can tell. When routing for the bindings, for example, the side material does not chip away along the glue line on either side of the tapes.

One other anecdote:

After the last festival in Newport RI Mark Blanchard mailed his guitars home. The airplane carrying them went into a mountain side at high speed. Two of the guitars were thrown clear, and the Postal Service sent them to him (smelling of jet fuel). They were in good 'normal' cases (not 'flight' cases), which were, in turn, in case covers. The covers were ripped, and the cases separated at the edges around the top and back in places. The damage to the guitars was pretty amazing. Any localized mass, such as the bridge or blocks, simply sheared through whatever it was attached to, so one bridge punched cleanly through the top. The tuner shafts were bent. The sides, which had tapes, were intact, and Mark told me they were not even cracked other than where they were sheared off at the ends. Again, circumstantial, but convincing.


Great question! :cheers:
I like to imagine ...
User avatar
John Platko
THREAD STARTER
 
Name: John Platko
Posts: 9411
Male

Country: US
United States (us)
Print view this post

Re: Building a Steel String Guitar

#132  Postby hackenslash » Nov 22, 2015 6:57 pm

John Platko wrote:What I was taught by Al Carruth


There's a name that, as a guitarist, musician (yes, those are different things) and music producer of several decades' experience, I know well. You were taught by Al Carruth?
hackenslash
 
Name: The Other Sweary One
Posts: 22910
Age: 54
Male

Country: Republic of Mancunia
Print view this post

Re: Building a Steel String Guitar

#133  Postby Onyx8 » Nov 22, 2015 7:05 pm

Thanks for that.
The problem with fantasies is you can't really insist that everyone else believes in yours, the other problem with fantasies is that most believers of fantasies eventually get around to doing exactly that.
User avatar
Onyx8
Moderator
 
Posts: 17520
Age: 67
Male

Canada (ca)
Print view this post

Re: Building a Steel String Guitar

#134  Postby Onyx8 » Nov 22, 2015 7:15 pm

Loved the line: "...we'll know in 75 years or so whether it works." :lol:

Slightly OT but it reminds me (in style) of a line in a book on sharpening tools (that I seem to have lost, shit!) which went: " There are two rules to keeping a saw sharp: Never cut dirty or nail-embedded wood; and never lend your saw to anyone. As a corollary if you have to cut dirty or nail-embedded wood, then borrow someone else's saw."
The problem with fantasies is you can't really insist that everyone else believes in yours, the other problem with fantasies is that most believers of fantasies eventually get around to doing exactly that.
User avatar
Onyx8
Moderator
 
Posts: 17520
Age: 67
Male

Canada (ca)
Print view this post

Re: Building a Steel String Guitar

#135  Postby John Platko » Nov 22, 2015 8:51 pm

hackenslash wrote:
John Platko wrote:What I was taught by Al Carruth


There's a name that, as a guitarist, musician (yes, those are different things) and music producer of several decades' experience, I know well. You were taught by Al Carruth?


Yes, I studied with Al one day a week for about 6 years. Although at one point I somehow talked him into a solid month of working with him.

Here's me back in the mid 90s at the Luthiers Workshop. I'm the guy in the middle with the blue shirt and more hair than I have now.

The Luthiers workshop was run by Al Carruth and Tom Knatt. Sadly they went their separate ways shortly after this picture was taken. My class followed Al to his new shop.

Image

Al studied violin making with Carleen Hutchins. I posted some links to videos of her back here and in the post after that.
I like to imagine ...
User avatar
John Platko
THREAD STARTER
 
Name: John Platko
Posts: 9411
Male

Country: US
United States (us)
Print view this post

Re: Building a Steel String Guitar

#136  Postby John Platko » Nov 23, 2015 4:27 pm

Inletting the back braces

I clamp the back on and align it on the center seem. I also check that the braces are about where I want them.

Image

Then I mark the sides where the braces will go and also mark the brace at the edge of the sides.

Image

I cut the brace a bit shorter than the mark that I made to account for the thickness of the sides. Some folks leave a bit more room so the braces can move a bit with changes in humidity without hitting the sides.

The mark on the right shows where I marked the brace when it was in position. The mark on the left is where I will cut the brace.

Image

Saw and then chisel off the excess brace material as was done on the top.

Image

Check that the ends of the brace are flat and the right height, about 1/8”. Adjust if necessary.

Image

Now I need to inlet the lining for the braces. I mark where the braces will go.

Image

I use a saw to cut the lining to the depth of the brace. I usually leave the sides intact, that is, I don't cut the sides just the inside of the lining and then chisel out a pocket. Instead, you can just cut the lining and sides to the depth of the brace because the sides will be routed for the binding at this spot anyway. If you want to cut the sides though, be careful not to go too far.

It's important that the depth of the slot in the lining is correct, but not so important that the width is an exact match.

Cutting the lining.

Image

Chisel out the slot.

Image

I didn't have my tripod set up and I ran out of hands but I like to hold a small block against the side when I'm chiseling out the lining so I don't slip and crack the sides.

Image

I put the back on and check that everything lines up. Usually I have to adjust the depth of the slot a bit, do this slowly, you want the brace to fit with the right depth in the lining.

At this point I mark where the center reinforcement meets the heel block and then remove the back and chisel the center reinforcement to size. I measure and do the same thing for the center reinforcement at the tail block.

Image

The final brace slots in the linings.

Image

Image
I like to imagine ...
User avatar
John Platko
THREAD STARTER
 
Name: John Platko
Posts: 9411
Male

Country: US
United States (us)
Print view this post

Re: Building a Steel String Guitar

#137  Postby John Platko » Nov 24, 2015 1:24 pm

Tuning the back braces, adding a label and closing the box


When I rough carved the back braces I left them a little heavy, Now it's time to shape them to their final size.

I close up the box with spool clamps and record taps at the bridge location and back. This is far from a science at this point so I'm reluctant to go into too much detail showing what I do but I'll put together a few charts in case anyone is interested.

"Tuning" the back braces. main goal is too make sure the back isn't too stiff- other people have other goals. However, if by chance you do end up with a back that is too stiff you can reach into the sound hole and shape the braces a bit. Also, if you end up with a wolf note that you don't like you can add a bit of mass here or there and tone it down. So, I wouldn't worry about this too much.

Image

This is also a good time to add a label. Peek through the sound hole as you decide that placement you like for your lable and put a mark there.

Image

A bit of Titebond on the back of the label.

Image

Smooth in place.

Image

When I think I'm getting close to the brace stiffness that I'm looking for I double side sticky tape a bridge to the top so I get a bit more accurate read on what's happening. It would be better to use the actual bridge that the guitar will get but I'm going to use what I have on hand.

Image

As I profile the back braces I take audio samples with the back clamped onto the body. I tap at the bridge location. I like to take data with and without a “false” bridge taped onto the top. It's a bit more realistic with the false bridge.

Image

Image

Each time I shave the braces I measure where I'm at. As I shave the back braces I lower the low resonance frequencies of the whole guitar. Here are some top tap measurements without a bridge.

Image

Adding the bridge makes a big difference. Here's a with (tap2) and without (tap1) bridge comparison.

Image

This should give you and idea of how the profile of the braces ended up. Traditional Martin lower bout back braces would be almost twice as wide and a bit lower than my braces. Many modern lower back braces would be narrower and higher. The upper bout braces are pretty close to what Martin and most others use.

Image
I like to imagine ...
User avatar
John Platko
THREAD STARTER
 
Name: John Platko
Posts: 9411
Male

Country: US
United States (us)
Print view this post

Re: Building a Steel String Guitar

#138  Postby John Platko » Nov 25, 2015 1:51 pm

Gluing on the back

I do a final dry fit. I use fairly thick flexible piece of plywood for a caul on the back. I like to keep the form on while I use the spool clamps, the caul helps extend their reach.

Image

Also, I like to keep waist and heal-tail spreaders in place as I glue on the top. Make sure you'll be able to get them out later.

Image

Check inside to make sure that the lining fits snugly against the back. And you can do one final glue clean-up, as I did after seeing this picture.

Image

I'm using Titebond to glue the back on. Although I would prefer hot hide glue, my process and I are not fast enough for that. If you want to go that route then I suggest using the go-bar deck for the clamping system at this step, it will be much faster than the spool clamps that I'm using. It's also best to have a helper if you use hide-glue.

You don't want too much glue on the linings because then you'll have too much squeeze out inside the guitar. I do something like:

Image

And spread it out with my finger.

Image

Glue on the whole guitar.

Image

After the finger.

Image

Put the back on, put the caul on, make sure everything lines up and quickly clamp it in place. Like so.

Image

Image
I like to imagine ...
User avatar
John Platko
THREAD STARTER
 
Name: John Platko
Posts: 9411
Male

Country: US
United States (us)
Print view this post

Re: Building a Steel String Guitar

#139  Postby ElDiablo » Nov 25, 2015 4:52 pm

Rather Amazing. Thanks for posting this.
God is silly putty.
User avatar
ElDiablo
 
Posts: 3128

Country: USA
United States (us)
Print view this post

Re: Building a Steel String Guitar

#140  Postby John Platko » Nov 26, 2015 1:46 pm

ElDiablo wrote:Rather Amazing. Thanks for posting this.


Your Welcome. :cheers:
I like to imagine ...
User avatar
John Platko
THREAD STARTER
 
Name: John Platko
Posts: 9411
Male

Country: US
United States (us)
Print view this post

PreviousNext

Return to Technical Design and Engineering.

Who is online

Users viewing this topic: No registered users and 1 guest